Showing posts with label Arts and Crafts. Show all posts

Knitted Dishcloth or Facewasher


Hand-made Knitted Dishcloth or Facewasher

Once you start looking, you'll find heaps of amazing dishcloth patterns on the internet!! I have only just discovered the awesomeness of home-made dish clothes, so have only tried this pattern. But, I am hooked, and will be trying and sharing more patterns soon!! But honestly, once you try these, you won't want anything else!!  And give one away as a gift, and they'll be begging for more!!

Materials: 8 ply cotton; Size 4 mm

Instructions:
Cast on 4 stitches
Row 1: Knit 4
Row 2: Knit 2, yarn over, knit across the row.
Repeat Row 2 until you have 49 stitches on the needle.
Row 3: Knit 1, Knit 2 together, yarn over, knit 2 together, knit to the end of the row.
Repeat Row 3 until you have 4 stitches on the needle.

You can now either bind off or do a round of single crochet and make a little loop of chain stitches in one corner so you can hang the cloth to dry when you are finished using it.


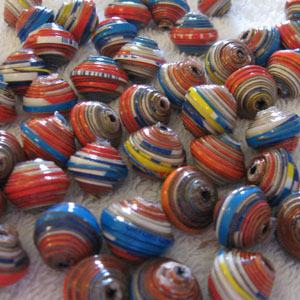


Paper Beads

Making Paper Beads

Here is a little tutorial for paper bead making. I have to admit that I am yet to try my hand at these....but I am very eager!!  And when I do, I will upload my own photos!  Apparently you can use magazine paper or specifically choose scrapbook paper with a color or design you like.


Supplies:

Glue
Ruler
Scissors
Paper
Fishing line or Floss
Toothpick or long needle
Paper or magazine pages
Glass beads
Necklace eye and hook


You take your sheet of paper, measure and mark long triangles on the backside of the print. If you mark on the pattern your bead will just end up the color of the mark. The size of the triangle will determine the size of the bead

Cut out each triangle.

Take a needle or a toothpick to roll the paper around. Some people use a needle because it makes a small, tight bead. Starting with the fat end of the paper roll tightly around needle.

When you come to the end of the paper place a line of glue on the tail of it and finish wrapping, working the glue into the roll and end.

Once you have completed all of the beads they need to be sealed. This can be done a number of ways. You can make a watered down solution of glue and water, use enamel or spray a high gloss clear coat. You could string your beads on some fishing line, hung them up outside and sprayed a few coats of clear gloss.


Let the beads dry for 24 hours before stringing them into a necklace.

I can't wait to try these!!

Baby Belly Bag


My little princess, Elivia!

I found this neat idea on a blog, and instantly took a liking to it!! Not only am I a keen sewer, but I have oodles of material to use up, and I have a new baby who suffers colic! So, I was going to give this a go!! 

This would make an amazing gift for all new Mums! Just spruce it up a bit with cute fabric and maybe even some lace and applique!

You will need small scraps of fabric, Rice, Essential Oil, and basic sewing skills

Take rice and place in a bowl, drop Lavender oil onto the rice (about 2 drops per cup of rice) and stir.

Fold your fabric wrong side out. Trace your measurements on the fabric with a fabric marker. I think a good baby size is 6 in X 6in.
Cut the fabric, sew pieces together leaving a small opening in order to turn the fabric right side out as well as pour the rice inside.

Pour rice into the bag, turn the edges under keeping in alignment with the seam and stitch it up.


If you are makiing these for a new mum, make a tag with instructions. "Place rice bag in microwave for about 30-90 seconds. Shake rice around making sure to distribute the heat. Place on baby's belly and swaddle. Heat holds up to an hour. Relieves gas and provides comfort."

On a side note, a bigger bag can be made and used for the purpose of laying on the baby's belly and chest to help them feel comforted when someone is not holding them.It kinda act as that warm body they always seem to know lets them go.